Showing posts with label Bread. Show all posts

August 22, 2010

Earl Grey Yogurt Muffins

Yummy muffins.

A perfect breakfast treat or a simple-yet-elegant dessert to serve when entertaining, these muffins are excellent served alongside a pot of tea.

They have a satisfying texture: chewy on the outside and moist on the inside, compliments of the plain yogurt. They have a surprising, delightful creamy citrus flavor--an Earl Grey tea distinctive.

These Earl Grey Yogurt Muffins are pleasantly sweet. As-is, I think they could multitask as a light dessert cupcake. One could reduce the sugar amount slightly, thus reducing the sweetness, though such a reduction isn't necessary.
Prior to inventing this recipe, I had been toying with ideas for such muffins for several weeks. I once saw a recipe on a British blog for a cake that used Earl Grey tea leaves (the small particles, or fannings--which are typically what you find packaged in tea bags--or loose leaf tea ground into small particles resembling fannings). Neat idea! I also often came across recipes for yogurt muffins in my many Internet travels. Another neat idea! Why not combine both neat ideas?
One day, I finally decided to try it.
Happily, I found that the proportions I chose were right, and the muffins not only held together and didn't burn, but they also were really tasty and pleasantly aromatic. (Not all my culinary inventions have wonderful results, though they do tend to be edible, regardless.)

Have fun trying this recipe! Let me know what you think. :~)

Removing the muffins from the muffin tins: When using nonstick bakeware, one has to be careful not to scratch the nonstick coating. Sometimes it's tricky to get anything done (like removing muffins from nonstick tins) when exercising such caution. Even though baked goods don't strongly adhere to a nonstick surface, they do tend to stick just a bit, even when the surface is greased. Plastic knives can scratch the coating, so...
Idea: Use a small rubber spatula.
How: Carefully loosen all around the sides of a muffin.
Then slide the spatula underneath the muffin. Press downward against the pan, so the end of the spatula will bend underneath the muffin.
Rotate the spatula in a circle beneath the muffin, then pull up and pop it out. This technique worked well for me. The muffins stayed intact, and very little baked batter was left in the pan.
Note: My pictures depict a small spatula removing a mini muffin from a 24-cup muffin tin.

Well, anyway, on to the recipe...

Earl Grey Yogurt Muffins
Estimated time: 40 minutes (about 20 minutes prep time and 15 to 20 minutes baking time)
Makes 2 dozen regular-sized muffins (or 1 dozen regular-sized muffins plus 2 dozen mini muffins)

Ingredients
  • 2-1/2 cups all-purpose flour
  • 1/2 teaspoon salt
  • 2 teaspoons baking powder
  • 1 teaspoon baking soda
  • 1 tablespoon Earl Grey tea leaves* (about 3 teabags worth) 
    • *The tea should be the size of small particles
  • 2 cups plain (unflavored) yogurt (low fat)
  • 1/2 cup unsweetened applesauce
  • 2 eggs
  • 3 teaspoons imitation vanilla extract
  • 1 cup granulated sugar

Instructions

1. Preheat oven to 350 degrees F.
2. Grease 2 regular-sized 12-cup muffin tins (or 1 regular 12-cup tin plus 1 mini 24-cup muffin tin).
3. Cut off the tops of the Earl Grey tea bags and empty the tea into a small bowl. Measure the amount to ensure it is approximately 1 tablespoon (a little more or a little less is fine). The tea should resemble small particles, similar to coffee grounds.  
4. Measure the flour, salt, baking powder, and baking soda into a medium bowl.
5. Add the tea leaves, then stir the dry mixture thoroughly. Set aside.
6. Into a stand mixer (or a large bowl with which to use a hand mixer), measure the plain yogurt.
7. Add the unsweetened applesauce.
8. Add the vanilla extract.
9. Add the eggs.
10. Add the granulated sugar.
11. Cream those ingredients together on medium speed for about 1 minute.
12. Add 1/2 of the flour mixture to the wet ingredients. Mix on low speed for about 10 seconds.
 13. Add the rest of the flour mixture and mix well for about 15 seconds on low then increasing to high speeds.
14. Scrape down the insides of the bowl with a spatula.
15. Mix the ingredients on medium speed for about 5 seconds.
16. Spoon muffin mixture into prepared muffin cups, filling each about 3/4 full.
17. Bake as close to middle of the oven as possible (ideally on the same rack, if they will fit side-by-side) at 350 degrees for 15-20 minutes, until a toothpick inserted into the center of a muffin comes out mostly clean.
18. Carefully transfer muffins to cooling racks.
19. Serve the muffins warm or cooled, and freeze some of them to savor later.

Enjoy!

July 3, 2010

Oatmeal Flour Pancakes

These pancakes are just so amazingly good...


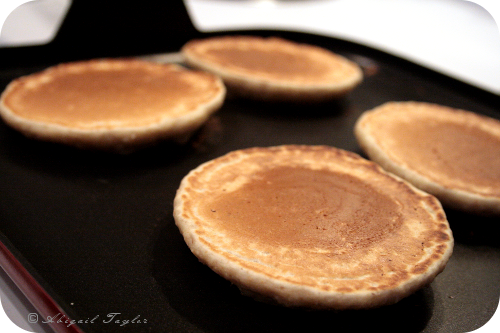
"Bisquick never again," I thought as I ate my second bite from a small stack of these tasty morsels. These pancakes are hearty and dense, but still a tad airy, with a pleasing moist, chewy texture. The flavor is slightly sweet with the added richness of oatmeal. I highly recommend these pancakes. 
This recipe makes about 14 pancakes that are about 4" in diameter. I think they would freeze well, if you want to make some for later, but they're definitely the tastiest right off the griddle.

Making the oatmeal flour: It's a simple process. It should take much less than 5 minutes to make what you need for this recipe.
Process about 2-1/2 cups of rolled oats (I used some labeled "oven-toasted old fashioned oats") in a blender or food-processor until the mixture resembles a coarse flour. You'll need 1-1/2 cups of this flour for the pancakes. I used a blender because I disdain washing all the food processor's parts. I pulsed the oats a few times then blended them on a medium setting for about 15 seconds. Then I stopped the blender and stirred toward the middle any oats that weren't getting mixed in from the edges. After pulsing a few more times and blending a little bit more, the flour was ready.

Extra oatmeal flour: Try adding leftover oatmeal flour to a fruit smoothie. It's tasty and provides some additional nutritional goodness.

The story behind the oatmeal flour: For the past few weeks, I've been making granola frequently. It's a nice alternative to packaged cereal (especially since my favorite cereal costs a bunch), I can monitor exactly what goes into it, and I really like oatmeal. Once I make a batch or few of a granola that I really really like, I'll post the recipe. Until then, I'll continue tweaking.

Anyway, to fuel this granola-making endeavor, BT and I picked up a 10-pound box of oatmeal at a warehouse store. It was a great price! Then, at home, I looked at the box and realized it wasn't the quick oats that I had thought we were buying; instead, it was a mammoth amount of old-fashioned rolled oats. I prefer using mostly quick oats for granola-making because it produces a granola with a nice clumpy and chewy (but not too chewy) texture.

Temporarily unnerved by my discovery, and despising the thought of returning the huge package of oats, I quickly realized a solution: I would just process those rolled oats in a blender and use the resulting chopped-up-coarse-flour mixture along with some rolled oats in my granolas. It worked. (Sorry, profs, that is totally an incomplete sentence devoid of an antecedent.)

In the midst of the oatmeal-to-flour processing, I remembered once hearing about oatmeal pancakes. And thus the muses lent me the idea for this pancake recipe.

A few days later, I decided to create my own oatmeal flour pancakes. After researching five different pancake recipes (some involving oatmeal, some not) and comparing the common ingredients and typical ratios, I wrote down a list of ingredients I wanted to use and put away the sample recipes. Then I started measuring and pouring.
"Hmm...that looks about right....I guess," I'd think with each scoop and stir. Finally, with hesitant excitement, I dropped two quarter-cup scoops of batter onto a hot griddle. Waiting....watching....whoa! Bubbles appeared! That was a good sign! Then I flipped over the pancakes and--behold! Two perfectly golden pancakes!
And a small bite proved that they even tasted like pancakes--and delicious ones, at that!

So the moral of this story is the following: If you like pancakes, you should try this recipe. :-)


Oatmeal Flour Pancakes
Total Estimated Time: 30 - 40 minutes (includes 5 minutes for making the oatmeal flour from rolled oats)
Makes about 14 3"-4" diameter pancakes
Serves: 2 - 4

Ingredients
  • 1-1/2 cups oatmeal flour *
  • 3/4 cup all-purpose flour
  • 1 tablespoon granulated sugar
  • 1/2 teaspoon salt
  • 1 tablespoon + 1 teaspoon baking powder
  • 1 egg
  • 1 cup milk (plus some extra)
  • 1 teaspoon imitation vanilla extract
  • 1 tablespoon lemon juice
  • 2 tablespoons unsweetened applesauce
* To make the oatmeal flour, process about 2-1/2 cups rolled oats (a.k.a "old-fashioned rolled oats") in a blender or food-processor until it resembles a coarse flour. You'll need 1-1/2 cups of oatmeal flour for the pancakes.


Instructions

1. In a medium bowl, stir together oatmeal flour, all-purpose flour, sugar, salt, and baking powder. Mix thoroughly.
2. Crack 1 egg into a small bowl. Beat slightly.
3. Add 1 cup of milk to the dry mixture in the medium bowl. Stir. Add the egg, vanilla, lemon juice, and applesauce. Stir well to combine. Add an extra tablespoon or two of milk if needed. Batter will bubble slightly.
4. Heat an ungreased nonstick flat griddle over medium to medium-high heat. (The heat level will determine the darkness of the pancakes, as well as their cooking time.)
5. Drop batter by 1/4 cup scoops onto the griddle (each should be an inch or more apart).
6. Cook until small bubbles (about 10) appear in the pancakes (about 2 minutes).
7. Flip the pancakes over, and cook them for about 3 more minutes.
8. Transfer finished pancakes to a plate. Keep them covered or in a warm (but turned off) oven.
9. Repeat steps 5-8 with the remaining batter (makes about 14 pancakes).
10. Serve pancakes with butter, syrup, jam, or whatever you like. They're even tasty plain.


Enjoy!

June 9, 2010

Easy Pizza Dough


Let's try some pizza dough...

{Pizza topping recipes are coming soon!}

Pizza is a fun food to make. Everybody can participate in adding the toppings. Pizza is especially fun to eat. Rather than ingest the extra calories, fats, and oils associated with pizza chain pizzas, many people will design their own pizzas, using purchased pre-made pizza dough or pre-formed crusts. That's great! But why not try making the entire pizza yourself?

Pizza dough isn't hard to make. This recipe includes only 7 ingredients. Preparation is minimal. You'll "knead" the dough with a spatula at one point, and at another point, you'll press it out onto the pizza pan. The rest of the time involves allowing the yeast to proof, the dough to increase in volume, and the pizza to bake. Go ahead--try it.

About kneading: When combining all the ingredients to form the dough, use a good-sized rubber spatula. You'll start out by stirring the dry ingredients into the wet ingredients, going slowly to avoid poofs of flour all over the counter and cabinets. Be sure to scrape the bottom of the bowl frequently. Eventually, the mixture will resemble a somewhat crumbly dough, and you'll suspect that in no way shall those unruly lumps all come together into one ball of dough. Keep kneading the dough with the spatula. Use a bit of elbow grease, and really press the spatula into the dough as you turn it and fold it. It will come together, and you'll find before you a nice, semi-smooth, undivided lump of pizza dough. Congrats.

About covering the dough: When you cover the ball of dough, use a fabric cloth. A kitchen towel or a large wash cloth will do the job.

About the room's temperature: The dough will rise more quickly if it is in a warm area. Placing the bowl on top of the preheating oven (don't put it inside the oven) may help. Don't bump the bowl while the dough is rising.

About the rising dough: The last time I made this dough, I let it rise for 40 minutes, and it tripled in volume. Thus, it was quite easy to spread the dough out on the pizza pan. The time needed for the dough to rise sufficiently will depend on many factors (the yeast, the other ingredients, the room temperature, etc), but you may find that it is ready after just 20 minutes (enough time to assemble the pizza toppings). The dough may be rather dense if it did not increase in volume significantly, but, with patient effort, you should be able to spread it out on nearly any pizza pan. If you'd like the crust to be a bit deeper and fluffier, allow some time for it to rise on the pan before you add the toppings. It will also rise as it bakes.


Easy Pizza Dough
Estimated dough preparation time: 30 - 90 minutes
Estimated time for adding toppings: 5 minutes
Baking time: 15 - 20 minutes
Serves: 4 - 6 (makes one pizza crust)

Ingredients
  • 3/4 cup water
  • 1/4 cup milk
  • 3/4 teaspoon granulated sugar
  • 2 teaspoons active dry yeast
  • 2-1/2 cups bread flour
  • 1/2 teaspoon coarse salt
  • 1 tablespoon extra virgin olive oil
Instructions

1. Preheat oven to 450 degrees F. Lightly grease a pizza pan.
2. Combine the water and milk and warm the mixture in the microwave for 25-30 seconds. The liquid should be just warm, not hot.
3. Pour the liquid into a medium bowl. Stir in the granulated sugar. Then add the yeast. Let the mixture stand until it becomes foamy (about 10 minutes).
4. Once the yeast mixture appears creamy, measure the flour and add it on top of the liquid in the bowl. Sprinkle the salt on top. Then add the olive oil.
5. With a rubber spatula, stir then knead the mixture until it forms a fairly-smooth ball of dough.
6. Transfer the dough to an oiled bowl, or lightly oil the bowl you have been using. Cover the bowl with a cloth and let it rest for 15-45 minutes, until the dough increases in size. To speed up the process, place the bowl near (on top of) the preheating oven. The more the dough rises, the easier it will be to spread it out on the pizza pan. If you're using a large pizza pan, let the dough double or triple in volume.
7. After the dough rises sufficiently, gently deflate it by tapping the surface with a floured hand. Then transfer the dough to a lightly floured surface.
8. Press the dough out into a flat, round shape with a diameter of six inches or so.
9. Transfer the dough, in that shape, to the lightly greased pizza pan. Knead and press it out towards the edge of the pan until it reaches the desired diameter and thickness.
10. Spread desired toppings over the crust.
11. Bake pizza in preheated oven for 15-20 minutes, or until the crust is golden brown.
12. Let the pizza cool slightly before slicing and serving.


Enjoy!