Showing posts with label Dessert. Show all posts

April 7, 2011

Peanut Butter Cookies


A simplified variation of the Peanut Butter Cookie...

You can make these cookies fast for a dessert or sweet snack needed in a pinch. They won't last long. Thus you shall find that both making them and eating them is a cinch.

This recipe makes 1 dozen cookies and uses 4 ingredients.

Freezing: I found that these cookies freeze well. After baking them and allowing them to cool, I wrapped half of them up (individually) in plastic wrap, put them together inside a freezer bag, and froze them. They were easy to reheat in the microwave.

Peanut Butter Cookies
Estimated total time: 20 minutes
Makes 1 dozen cookies

Ingredients
  • 1/2 cup peanut butter 
  • 1/2 cup all purpose flour
  • 1/4 cup sugar
  • 1 large egg, beaten just slightly
Instructions
  1. Preheat oven to 350 degrees.
  2. Grease one cookie sheet.
  3. Mix all ingredients together with a rubber spatula.
  4. Form cookie dough into twelve 1-inch balls.
  5. Place each ball onto the greased cookie sheet leaving 1-2 inches of space between them.
  6. Flatten balls (to about 1/2" or 1/4" thickness) with the flat bottom of a glass, jar, or plate. 
  7. Bake at 350 degrees for 8-10 minutes until set. They'll be slightly crispy/golden on bottom. 
  8. Enjoy them warm or cool them and then freeze or store them. Yum.


Enjoy!

September 24, 2010

Mini Blueberry Pies

Simple and delicious miniature pies...

I had a difficult time naming these munchkins; I wanted to invent a name more creative than "Mini Blueberry Pies." In the end, though, as occurred with my Yummy Oatmeal dilemma, I settled on that name because it is what defines them: They are miniature blueberry pies--made with a pie crust, blueberries, and a few other ingredients.

Ahhh, these little pastries are a tasty dessert. Plump, juicy blueberries, lightly sweetened and enveloped by a warm, flaky crust. I highly recommend serving these pies with vanilla ice cream because they are only lightly sweetened, and the addition of cold, smooth, ice cream balances out the sweetness and excellently complements the flavors and textures of the pies.

I don't have any pictures of the pies paired with ice cream....but you may feast your eyes upon this snazzy pic of one pie--nicely golden brown. Yum.
If you're feeling a little bit bold, you could substitute a different fruit for the blueberries. Raspberries, strawberries, or maybe even apples would likely work. I would recommend cutting large fruits (like apples and strawberries) into smallish pieces before mixing them with the sugar, flour, etc.
I'm excited to try this recipe again soon. I plan to use a different fruit and see how it goes. If you try this recipe, let me know what you think. :-)


Mini Blueberry Pies 
Estimated preparation time: 20 minutes plus time to bring crust to room temperature as per package instructions
Estimated baking time: 25 minutes
Serves: 4

Ingredients
  • 1 refrigerated pie crust
  • 1-1/2 cups fresh blueberries (about 3/4 of a pint)
  • 1 teaspoon lemon juice
  • 1 tablespoon sugar
  • 2 tablespoons flour
  • About 1 tablespoon butter, divided into fourths
  • Vanilla ice cream (optional, but exceptionally tasty, accompaniment)
Instructions

1. Prepare the pie crust according to the package directions (usually it is suggested that you let the crust come to room temperature, which takes around 15 minutes--sometimes you can microwave it for a few seconds, but check the instructions).
2. Preheat the oven to 450 degrees F.
3. Rinse the blueberries and shake off excess water.
4. In a bowl, stir together the blueberries, sugar, and lemon juice. Then add the flour. Set this mixture aside.
5. Unroll the prepared pie crust onto a cutting board.
6. Cut the crust into fourths (a pizza slicer is a great tool for this). Pull the pieces apart a bit.
7. Place a scoop of about 1/4 of blueberry mixture in the center of a pie crust piece.
8. Fold up the crust around the mixture, firmly pinching the 4 edges to form a little pouch around the blueberries. Leave the top of the mixture exposed a bit, but make sure that everything is contained inside the pie crust and there are no holes on the edges.
9. Repeat steps 7 and 8 for all pieces of the crust, using equal parts of the blueberry mixture for each.
10. Place the miniature pies in a pie dish or another oven-safe dish.
11. Top each mini pie with a slice of butter (about 1/4 tablespoon for each).
12. Place the pie dish in the preheated oven on the middle rack.
13. Bake for about 10 minutes.
14. Carefully remove the dish and lightly cover the mini pies with a length of foil to avoid overly-browning the edges.
15. Place the dish back in oven and bake for about 10 more minutes.
16. Remove the dish and check the mini blueberry pies for doneness (they should be lightly golden-brown and very hot and bubbly).
17. If they aren't done yet, place them back in the oven without the foil for about 5 more minutes. The total baking time should be about 25 minutes.
18. Remove the pies from the oven.
19. Allow the mini blueberry pies to cool some before eating them because they will be quite hot.
20. Serve the pies with scoops of vanilla ice cream, or if you're gutsy, some vanilla yogurt or slightly-sweetened plain yogurt.

Enjoy!

June 19, 2010

Chocolate Chip Fake Crepe

A simple dessert...

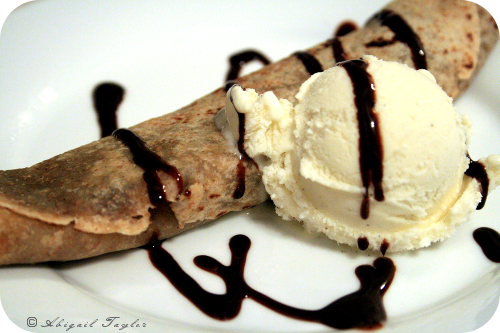
In Europe, I once had a fresh crepe served atop vanilla bean ice cream and smothered with chocolate fudge. Mmmm...

So...this recipe doesn't quite capture that taste, but it's an easy alternative that takes just a few minutes to prepare. It's tasty, too.

I used a soft whole grain tortilla, but any variety will do. Just make sure it's soft--malleable--so it can be rolled up easily and won't dry out quickly when heated.
When heating the chocolate chips, be careful not to overdo it. If they cook too long, the chocolate can actually dry out and take on a slightly burned flavor. You'll find that the chips get soft enough to spread surprisingly quickly. Use caution when rolling up the "crepe"; it will be hot, and the butter will accentuate that fact.

I think that ice cream is a must for this dessert--an excellent pairing. The drizzled chocolate syrup on top is optional (but it makes it look extra special). Alternatively, you could garnish it with some fresh berries.

*Note: The amount of chocolate chips shown in the pictures is more than the required amount--about a tablespoon is sufficient.

Chocolate Chip Fake Crepe
Estimated time: 5 minutes
Serves 1 - 2 

Ingredients
  • 1 teaspoon butter
  • 1 small tortilla (8" diameter)
  • 1 tablespoon semi-sweet chocolate chips
  • Vanilla ice cream
  • Chocolate syrup (optional)
Instructions

1. Coat the inside of a skillet with about 1 teaspoon of butter.
2. Turn stovetop burner to medium heat. Place tortilla in skillet. Heat for about 30 seconds. Turn heat to low. Flip tortilla over.
3. Sprinkle chocolate chips over the tortilla. Keeping heat on low, cook the tortilla for 30 seconds to 1 minute, until the chocolate chips become quite soft and shiny.
4. Once they are soft, use a spatula to spread the chocolate chips across the surface of the tortilla to about 1-inch from the edges. Work quickly or the chocolate will dry out and taste burned.
5. Immediately remove tortilla from heat. Carefully (it's hot!) roll it up.
6. Serve this chocolate chip "fake crepe" warm with a scoop of vanilla ice cream and a drizzle of chocolate syrup.


Enjoy!

May 6, 2010

Applesauce Toast Dessert

A simple, light dessert...

Tart applesauce and smooth cream cheese are complemented by the flavors of cinnamon and sugar. It's all sandwiched between lightly buttery slices of wholesome whole wheat toast and dusted with sweet powdered sugar.

Using ingredients that are commonly on hand, these sandwiches are easy to cook up in a pinch. It's a nice dessert that isn't full of fat and sugar. It's a tasty treat, even for kids--and they can help make it, too.

To make the dessert a bit fancier, try trimming off the crusts (before buttering the bread slices), cutting the finished sandwiches in fourths, and dusting the dainty squares with powdered sugar.

The measurements I list for the ingredients are approximations because amounts will depend on the size of bread you use--and the amounts should be according to your taste.


Applesauce Toast Dessert
Estimated time: 20 minutes

Serves: 1 sandwich per person (see ingredients below)

Ingredients
(Listed are approximate amounts for each sandwich)
  • Whole wheat bread (2 slices per sandwich)
  • Butter (just enough to spread lightly on 1 side of each bread slice: about 1/2 tablespoon per sandwich)
  • Unsweetened applesauce (2-3 tablespoons per sandwich)
  • Cream cheese, softened slightly (1-2 tablespoons per sandwich)
  • Granulated sugar (just a sprinkling for each bread slice: about 1/4 teaspoon per sandwich)
  • Ground cinnamon (enough to evenly sprinkle atop each bread slice: about 1/4 teaspoon per sandwich)
  • Powdered sugar (about 2 teaspoons for each sandwich)

Instructions
1. Lightly butter 1 side of every bread slice (2 slices per sandwich).
2. Place the slices butter-side-down on a cutting board or plate.
3. Spread the cream cheese on half of the slices (on the un-buttered sides).
4. Spread the applesauce on the other half of the slices (on the un-buttered sides).
5. Heat a griddle or low-sided skillet over medium-low heat.
6. Lightly sprinkle some sugar on top of the applesauce-coated slices.
7. Lightly sprinkle some ground cinnamon on top of the applesauce-coated slices and the cream-cheese-coated slices (or just the ones with applesauce).
8. Carefully transfer all slices to the griddle or skillet, and arrange them in one layer--buttered-sides down.
9. Cook on medium-low heat until the buttered sides are lightly golden (it will take just a few minutes).
10. Using a spatula (of the turner or flipper variety), scoop up a cream-cheese-coated slice and place it, cream-cheese side down, on top of an applesauce-coated slice and press down lightly, making a sandwich. Repeat with the other slices.
11. Cook sandwiches for another minute on low heat, being careful not to burn them.
12. Remove sandwiches from the heat, sprinkle some powdered sugar atop each one, slice them in half, and serve warm.


Enjoy!